Thursday, November 2, 2023


THE CRYPTIC CLOTH
 This is a 5- Color Quilt.
The center will measure 40” x 56” plus a border.

Start with a FOCUS fabric E and choose the remaining colors/fabrics with your FOCUS fabric E in mind. FOCUS fabric E may also be the outer border. Requires ¾ yards. If you intend to also use your Fabric E as a border include an additional 1 yard.

A is the center background. Requires 2/3 yard.

B is in the foreground. It frames everything and becomes the inner border. Requires 1 and 2/3rds yards.

C is an accent. It's a stand-out. Requires 2 /3 yard.

D needs to be a distinct contrast to Fabric C. Requires 2 /3 yard.

If you want to use scraps, they will work well for Fabrics C and D - BUT make sure you use fabrics that are distinctly in two contrasting color families. Red/Blue, Pink/Green, Black/White, Purple/Orange, etc.


                                            CUTTING

  • Fabric A - 2.5 inch x 2.4 inch squares.  Cut 144
  • Fabric B - 2.5 inch x 4.5 inch rectangles.  Cut 72
  • Fabric B - 3 inch x 3 inch squares.  Cut 12
  • Fabric B - 5 inch x 5 inch squares.  Cut 34
  • Fabric C - 2.5 inch x 2.5 inch squares.  Cut 48
  • Fabric C - 3 inch x 3 inch squares.  Cut 48
  • Fabric D - 2.5 inch x 2.5 inch squares.  Cut 68
  • Fabric D - 3 inch x 3 inch squares.  Cut 36
  • Fabric E - 5 inch x 5 inch squares.  Cut 34

                            DIRECTIONS


STEP 1

Stitch 68 Half-square triangles (HSTs) from 5” x 5” squares, 34 squares of Color B and 34 squares of Color E.

 Draw a diagonal line on the back of Color B, stitch ¼“  from the line on both sides, cut on the line.  Press to one side and square it up to 4 ½” x 4 ½ “.  Repeat for a total of 68 HSTs


STEP 2

     ·       Add a 2 ½” Color D square to all 68 HSTs from STEP 1.
·       To only 48 of these, add Color A 2 ½” square to the opposite corner from Color D.
·       Stitch on diagonal, trim


                        All 68                                                  


                    Only 48


STEP 3

Using all the 3” squares, sew on the diagonal, cut and square up to 2 ½” in the following combinations:
    ·       24 HSTs from Colors B/C
    ·       72 HSTs from Colors C/D


STEP 4

Using all 48 Color B rectangles (2 ½”x 4 ½”) – make 48 Flying Geese

·       Color A squares stitched diagonally on the LEFT.
·       Color B squares stitched diagonally on the RIGHT.


STEP 5

 Add a B/C HST to a Color B rectangle (2 ½”x 4 ½”).

        Match the Color B’s. It’s important.
        Make 24


STEP 6

Use 4 C/D HSTs to make PINWHEELS.  Check your placement – make sure Color C spins to the right. Make 18 pinwheel blocks.


NOW IT’S TIME TO MAKE THE BLOCKS


Block 1 – make 7

Use 24 large HSTs with both Color A and D on opposite corners, stitch 4 together into a larger square with all Color D to the center.  
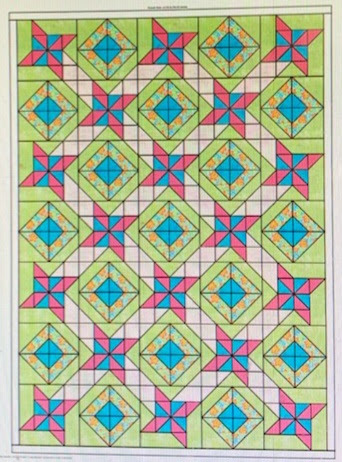
Refer to photo for proper placement.


Block 2 – make 10

Use remaining HSTs – 2 each with only Color D at adjacent corner. Stitch into larger blocks with all Color D toward the Center.


Block 3 – make 4


Block 4 – make 6


Block 5 – make 8


You have finished all the parts!

Block 1 – 7

Block 2 – 10

Block 3 – 4

Block 4 – 6

Block 5 – 8


Block Placement Diagram


WELL DONE!!


Tuesday, December 6, 2022

96 Charm Quillows

 I had a great idea! One of those ... thought about it in the shower and just had to do it ... RIGHT NOW! Forget about the fact that I might have other things on my "list". Forget about the fact that there might not be time. Forget about the fact that it might not work.

It worked!

I decided to make Quillows for 3 little girls in our family. We will be having an early Christmas on December 18th, which will involve cookie decorating but that's a whole 'nuther story.

These have been so much fun to make. Our M&M friend Lori Lewis hosted a novelty charm swap last year and I participated ... and acquired a LOT of charms.

First thing I did was sort through and make 3 stacks of charms, trying not to duplicate any fabric within each stack. Then I redesigned the 96-Charm Challenge layout.


Each quilt was a little different. The goal was to use what I already had in my sewing room. The redesign directions will be uploaded to the M&M Facebook group files.

With careful placement of the charms, an inner and outer CHARM border can be formed sew easily, with a final outer border added.

Amelia's quilt has shades of purple as the inner Charm border and musical notes as the outer charm border. Purple is always a favorite of little girls and I had enough 5" strips of several prints for the final border.


Paisley's quilt was actually the first try at the redesign. I wanted to use the red alphabet print as the outer border, but needed some separation from the busy center Charms. A light gray inner charm border and the red outer charm border worked. Using the same red fabric for the final border makes the whole thing "float." I love how it turned out.


And then there was Sage's quilt. I didn't have enough of the frogs for a charm border and an outer border. I used varying shades of blue solid for some separation, then several different darker charms for the outer charm border and finished it off with the frogs ... turned out CUTE!

All three of my littles live right here in Florida. They don't need warm quilts and they LOVE wrapping up and cozying under soft blankets. I left out the batting and simply quilted the tops with fleece - easy peasy. The quilts have a drapey feel which will get even softer with washing.

A QUILLOW? What is a quillow you ask?
These were first popular back in the 80's. As my littles really did not need more bed quilts (or so their mothers thought), I decided cuddle quilts that fold up into a pillow might work best ... it did!

Before attaching the binding, I stitched a 16" square pillow top. Laying the fabrics right sides together with a piece of scrap batting on top, I stitched around 3 sides, flipped it right side out and did some very simple straight line quilting. Center the open, unstitched end of the pillow top along the bottom BACK edge of the quilt and stitch the left and right side. Remember the bobbin thread will show on the quilt top. Leave the top edge of the pillow open.


Bind the quilt as normal. ALL of the binding for thesed three quilts came from my binding leftover bin. I did purchase the fabric for the "pillow" tops and I did purchase the fleece (with a coupon). Everything else came from the sewing room ... this was a GREAT stash buster.

When folded up in thirds in both directions, the quilt stuffs into the pillow, which is flipped out around the quilt. There are lots of Quillow instructions online. Honestly, I found most to be confusing so I was just winging it and it worked.


These are quilts that will be loved and washed and played with and get cozier and cozier. I think the 3 little girls are going to be very happy with their "Grammy blankets."


Saturday, October 1, 2022

Scrappy Thread?


I have a lot of thread.  No, let me rephrase that:

I have a LOT of thread!!!!!

Consider for a moment my sewing journey.  It started when I was 8 years old.  Summers spent at my grandmother's house playing with her fabric leftovers.  Making clothes for my Barbie dolls, I didn't have a pattern but I had scissors and a stapler.  Ok, so maybe I didn't do much "sewing" but it was my early adventure into fiber and fashion.  Not much happened between Barbie clothes and 8th grade Home Economics class where I earned a C+ because I refused to wear the dress I made to school - the requirement for an A.

By the time I graduated from High School I had made 2 quilts.  When I left college I was making my own clothes - more out of need than pleasure.  My career, it seemed, would require business clothes that were expensive.  With the help of my mom and eventually a class in fine tailoring I had enough dresses and suits to get by on a budget.  And my thread collection began to grow.  It was innocent at first.  I had neutral color thread for hand sewing quilts (because that's what I was taught) and I had exact matching color thread for sewing with fashion fabric (because that's what I was taught).  When I purchased my first domestic serger I started buying cones of thread - 4 at a time (because that's what the machine required).  And then there was machine embroidery . . . oh the possibilities!!  Oh the thread!!  And then came my long arm quilting machine and the very specific thread it requires.


I have never considered myself a thread-aholic.  I never set out to amass such a collection, it just happened as a result of all my various fiber related passions - the by-product of so much stitching - collateral damage caused by years and years of sewing.  Sewing for myself, sewing for others, sewing for free and sewing for money.  I've made clothes and dolls for kids and grandkids, custom shirts for Sierra Club, costumes for Halloween, costumes for Bible study, banners for church, lots of kitchen curtains and table clothes and too many quilts to count.  All these things were sewn with thread.  So it's not my fault, it just happened.  One Christmas my mom got hold of a dry cleaning supply catalog.  My present that year was various sewing consumables including bundles of  7" and 9" zippers in every color made - and thread - beautiful thread -  large dry cleaner sized spools of thread in so many colors.  It was one of the best Christmas presents I've ever received.


Recently a daughter of mine wanted to do some sewing for herself - what could make a mom more proud?  She needed fabric, which I was happy to supply.  She also needed thread - so I pointed her to the rack on the wall and said something like "if you don't see the color you need there let me know and I'll pull out the storage boxes - if I don't have the color you need, it doesn't exist".  Over the next several months my daughter sewed a few things, a couple pair of shorts, a bucket hat, a patchwork hoodie (very cute) and now she is accumulating a nice collection of estate sale fabric and "vintage" clothes "because repurposing them will be cool".  One day, as she was gathering supplies from my sewing room for her next project she asked "mom, who gets all your thread when you die."?    I laughed pretty hard.  As quilters we kid each other about the stash of fabric left behind when we go.  There are plenty of jokes and cartoons about it too.  But what about the thread?  What happens to all that thread?


I love making scrap quilts.  It's fun, it's frugal, it's a challenge and it's very satisfying.  Because a lot of my quilts are made from scraps, the fabric is often many, many different colors and always with some contrast.  I piece these quilt tops using neutral color thread.  For years I have purchased good quality thread in gigantic cones of 3 basic colors. But why??  


If the fabric is many colors why isn't the thread many colors?  Or at least one "color"?  Why does it need to be neutral?  I have made several monotone or 2 tone quilts over the years. I stitched those with the same color thread as the fabric.  A blue and yellow quilt, for example, could be stitched with either blue or yellow thread.  A Christmas red and green quilt could be stitched with red or green thread.  So why can't a scrappy quilt be stitched with scrappy color thread??  I belong to a quilt block swap group - it's a lot of fun.  If you've never swapped with other quilters I highly recommend it.  Recently the swap block I was making was 15 different indigo squares with the bright white star.  Since indigo is so specifically dark blue I stitched the squares with indigo thread.  When I started to stitch the rows together there came the place where the fabric was white against white - for the star points.  Hummm, the indigo would not work there - so I switched to white thread.  That's when the light bulb went off and a decision was made!!!  I WILL use up my collection of thread to the best of my ability before I grow too old to sew.


In preparation for Hurricane Ian I pulled out a UFO that was put away years ago because it had issues that required a lot of un-sewing and seam rippers do not require electricity.   One problem with the quilt top was the modified piano key borders that needed much more variety in the fabrics - argggg the seam ripper had to work overtime.  The border was made entirely of homespun fabrics - mostly browns.  I wanted to brighten it up by throwing in a lot more blue and green homespun.  So I did, and guess what??  I stitched them with medium blue thread and used up not 1 but 2 almost empty spools.  Now I'm on a mission - next up is the outer border of that quilt, which is red - so red thread it is.


I am finding that it's very satisfying to use up the thread on a partially full spool.  I am excited to see how quickly the empty pegs grow in number as the spools of thread start to disappear.  It may take a while before a noticeable dent is made in the overall number but it's a step in the right direction.


Happy Stitching!

Marjorie

Tuesday, September 27, 2022

Huricane Prep ... Ian

 A major hurricane is about to hit Florida. In fact, as I'm typing this, the southern parts of the state are already feeling the effects of Hurrican Ian. His a BIG GUY! We live on the "right" coast - the Space Coast, on the Atlantic side of the state. We will likely be getting major tropical storm effects from Ian starting tomorrow and through Thursday ... wind and LOTS of rain. We're ready!

Sew - what's a quilter-who-knits going to do while the power is still on?

1. I cast on a cowl with some beautiful alpaca yarn that I got on our trip to Maine last month. A warm, soft cowl that I will never wear here in Florida but the yarn was hard to pass up so it came home with me. Now I'm dreaming of a reason to head north when the weather cools.

2. I cut and prepped all the wool pieces for my Sue Spargo September BOM - it's all ready for the fancy stitches.

3. I finished a donation Christmas quilt. 

Seriously?  

A Christmas quilt?

Several weeks ago, I was looking for something in a bin that is often homed in the guestroom bathtub. We don't get THAT much company. The bin sort of exploded all over my sewing room.


In the box was a cute panel and some HST's, among a whole lot of other stuff. Well, one thing lead to another and suddenly a scrappy quilt started growing under my needle.


The half-square triangles were already stitched into pairs. I had just enough for side borders. There were several pieces of Christmasy neutrals that were perfect of additional borders. This quilt was growing fast.

I even had plenty of already stitched scrappy piano key border fabric made. Last year (or was it the year before?) I got into some mindless sewing. I sewed and sewed - strips and scraps of Christmas fabric. I trimmed it all up to 4.5" and stored it back in the Christmas bin. 

What a find!!

A little yardage and some extra pieces = the perfect backing and just enough of a green for binding.


The quilt is done and ready to ship up to my former guild in Maryland. Southern Comforters of Bowie is very active in donating quilts all over the state - hospice centers, hospitals, schools, wherever there is a need. 


Both M's are hunkerd down with Hurricane snacks and hand-work projects. Jim Cantorri is on the Gulf Coast so I think we're pretty safe. We'll be checking in on Facebook. 

Keep Stitching,
Mary


Monday, August 29, 2022

Girlfriend Stars

 Did you watch our Facebook Live on August 1st? It's still up there if you want to check out what we did in honor of NATIONAL GIRLFRIEND DAY! We took the very simple Friendship Star block, added a twist (pun intended) and swapped them. 

Hurray for GirlFriends!

OK - sew, you made a bunch of blocks - now what?

I sewed mine (and Marjorie's) together in a straight 4 x 5 grid (no sashing). Then it was framed with a 2" inner border (from strips cut 2.5"). 

THEN - I made a whole lot of positive/negative Flying Geese pairs. 62 pairs = 124 units.

Stacked flying geese border!


Yes, they are a bit time consuming but totally worth it. Flying Geese is probably my favoite pieced unit. I have said many times - I am not a precision stitcher. I love to make units that are a bit oversized and then I can square-up to the exact size needed.

For me - Flying Geese can be expecially challenging to make accurately. They end up with either a saggy belly (the big triangle) and/or whacky wings (the 2 smaller triangles).

enter - BLOC LOC rulers!


I dearly love a great specialty ruler that gives me the results I want. Yes, they are a bit pricey. Yes, the Flying Geese ruler is a specific size - I have 4 different sizes because I make this unit a lot. Yes, there might be what some think of as waste - but ... I use the cut-offs so for me - it's not waste, it's a bonus!

There are lots of tutorials available online for making this unit. I'm showing you the quick and easy way. For specifics - Goggle it or even better ... get a Bloc Loc Ruler, it comes with great instructions.


I keep these pairs together every step of the way. Once they're stitched together into a Stacked Geese unit - into the pile they go. I need 62 of these beauties.

All those BONUS TRIANGLES ... I keep them together in sets of 4 matches. I stitch them up as "in-between" sewing. Bonnie Hunter calls them - Leaders and Enders.


When I have a spare minute, while talking on the phone or waiting for the water to boil (that's a joke - I don't cook much), I trim them up to 1.5" x 1.5". Again ... keeping the 4 matching triangles together.


Eventually, I will have a BUNCH of little Bear's Paw blocks all stitched up and ready for ... something. But that's a post for another day.


The Artimus lauch was scrubbed this morning. So much anticipation and excitment. Hopefully it will fly on Friday.  In the meantime, here's a picture from our trip to New England. 


Keep Stitching,
Mary


Tuesday, July 12, 2022

Enough Already

 When is enough - enough? 

When I hear that - ENOUGH! ... it sounds exasperated, even a bit hostile. Today I've had enough. Enough of working on something I don't love, working a technique I don't love, spending time with something I don't love at the expense of doing something I do love. "Something I do love," even if it's fleeting - why not work on something today that I've been thinking about, looking at and avoiding because of the other thing that's occupying my time.

Here's what I've had ENOUGH of and what I'm going to do about it.


I know what you're thinking ... OMG ... this is sew pretty!

Why yes, it is sew very pretty. It's also very fussy, very time consuming and very applique. It's a class, it was a bit pricey (certainly worth it) and it arrives in my email box EVERY month. The pattern ultimately calls for 13 full blocks, 8 half blocks and 4 corner blocks. AND ... a gazillion flying geese as sashing and border.

I'm done!

It's going to be just as pretty with 5 full blocks, 4 half blocks and 4 corner blocks. I still might do 1/2 a gazillion flying geese as sashing. For now - it's neatly folded up and gently put away. I will revisit the finishing work (maybe this year, maybe next). I have too many other great things calling out to get under my needle. 

I have had ENOUGH.

If you are interested in making this quilt. Check out Harmony by Rachelle Denneny. Her pattern and directions are excellent. For me ... a little goes a long way.

What's up next?


Keep Stitching, Mary


Monday, April 4, 2022

Tilt-A-Whirl

 Hello Springtime!

 Hello April!!

Hello M&M makers!!!

It's time for another quilt challenge. This one is super fast (and by that I mean EASY) and super CHARM friendly. If you've been participating in the SSPM guild swap, then you have lots of charms. If not ... then dig into your stash and find the perfect fabrics to cut into 5" squares.

The pattern directions have been uploaded to the M&M Facebook group. I included a link to easy "on-point" directions. The simplest of units can make the nicest quilts. A 4-patch and a pinwheel ... can't get much simpler than that! If you want more instruction and different math, check out Mari, the Academic Quilter - I saw this quilt there 1st. 

Let's get sewing!


My sweet grandie, Amelie, needs a "big-girl" quilt for her new bed. Purple is her favorite color. What is it about purple that is SEW appealing to 3 year olds? And ... I visited a new quilt shop and they have beautiful fabrics ... add that all together and you have the perfect combination for a new quilt.


Charms, 2.5" squares and yardage ... all of MY favorite things!

Hands 2 Help Comfort Quilt Challenge 2022 is where I originally saw this particular quilt. With Mari's permission (The Academic Quilter), I changed the math to make it more CHARM friendly. Links to her blog and H2H can be found in the pattern directions ... go to the Facebook group and check it out!

In the meantime, I have made the backing and the binding for this quilt. Then I put it on the "to do" chair. It will get quilted ... as soon as my Handiquilter gets better. She's a bit sick right now but help is on the way.

Keep Stitching,
Mary